Synthetik is game with a lot of unique mechanics, some of which may be unfamiliar for seasoned shooter players. It is important to become accustomed to the intricacies of Synthetik if you wish to take down the Machine Legion and stop Armageddon. Below is a basic overview of all the things you should get familiar with when starting the game for the first time.
Default Controls[ | ]
| Key | Function |
|---|---|
| WASD | Character Movement |
| Shift | Dash |
| E | Eject Magazine (Unspent bullets are wasted!) |
| R/Space | Begin Reload/Confirm Reload (see Active Reload System) |
| Numbers 1-7 | Activate Items |
| X | Examine Weapon Statistics |
| C | Examine Android Statistics |
| Q | Change Weapon |
| L | Drop Weapon |
| T | Ping (For co-op) |
| Tab | Map and Combat Log |
| Ctrl | Swap active ammo type if the magazine is ejected and there is a second ammo type available |
| Left and Right Arrows | Scroll between options at shops and shrines |
| Y | Confirm selection |
The User Interface and Related Mechanics[ | ]
It is important to familiarize yourself with the heads up display (HUD) elements, as they will provide you with much needed information both in and out of combat.
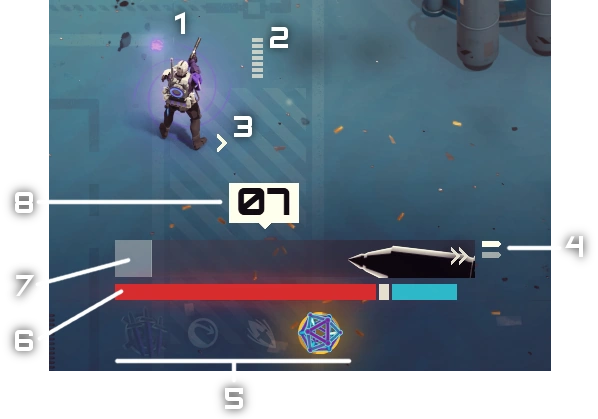
Health, Shields, and More[ | ]
| Number | Description |
|---|---|
| The player character. | |
| Optionally visible number of ammo in the magazine, this shows up if it is close to an end of magazine. | |
| Arrows shows number of dashes available, they will be faded when charging and fully white when usable. | |
| Current ammo type. Can be swapped when magazine is ejected with CTRL , but only if multiple types are available. Number of pips indicates how many types you have. | |
| Shows all active effects, buffs and debuffs, and passive abilities. May be displayed elsewhere depending on settings. | |
| Health bar (red), held armor plating (white), shield bar (blue). Health regenerates on its own or through scavenged items. Shield always regenerates when not taking damage. Plating blocks one damage instance, and can be found from killing enemies. | |
| Current weapon heat, which dissipates over time. Going past 100% deals heavy self-damage and will continue to do so if the player keeps generating heat. | |
| Current ammo in the magazine, depletes from right to left. Total ammo for the currently held weapon can be found on the weapon bar to the right. |
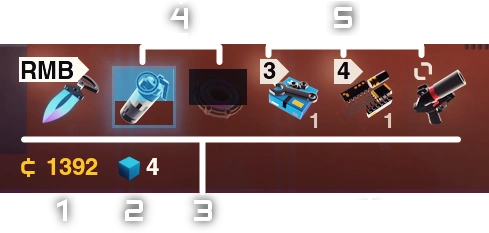
Items, Currency and Data[ | ]
| Number | Description |
|---|---|
| 1 | Credits, used to buy and upgrade weapons and items at terminals, gamble at shrines, and open certain locked chests. |
| 2 | Data, used out of runs to buy research and other permanent or single-run unlocks. |
| 3 | The item bar, which can hold up to 8 items, most of which will be collected during a run. Active items can be used with the number keys, passive items will activate automatically under certain conditions.
Items can be dragged and rearranged when holding right click by default, as well as moved off the bar to drop them to the ground. Moving items to the recycle icon will trade them for credits. |
| 4 | Currently active items will be covered in a descending blue or green bar. Ends effect when reaching the bottom.
Items on cooldown are covered in an ascending black bar. Ready to use again when it reaches the top. |
| 5 | Indicates the bound key for each active item. Passive items have a spinning icon instead.
Both are only visible when the item can be used. |
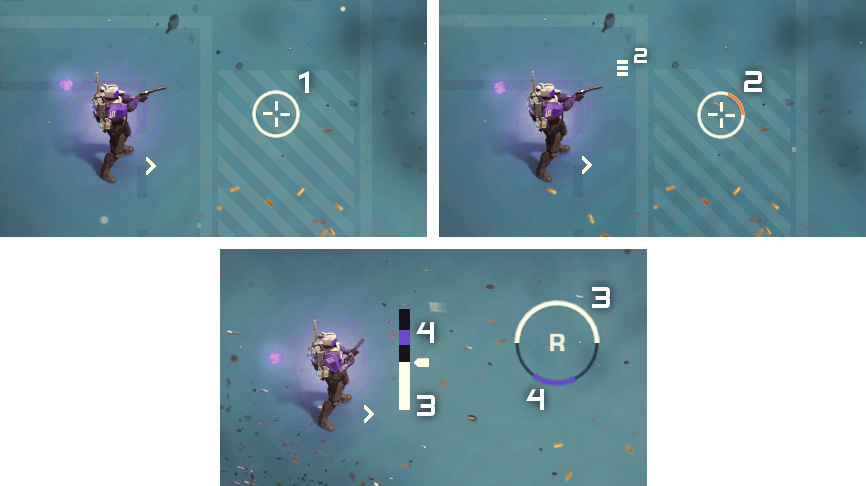
The Target Reticle and Active Reloading[ | ]
| Number | Description |
|---|---|
| 1 | The target reticle when the magazine is full. Note that the size of the reticle indicates current accuracy, the smaller the target reticle, the higher the accuracy and the more likely a shot will land. |
| 2 | The target reticle when the gun's magazine is near empty. If your magazine is close to empty then you will see white bars near your character on top right representing ammo left. |
| 3 | While reloading, the white portion of the reticle and the bar next to the player will increase rapidly until the bar and circle are full. |
| 4 | The colored area on the bar and circle define the space in which you can press reload to instantly finish the rest of the reload time and get a slight bonus. If you're using the Haste difficulty modifier, then the active reload area also has a brightly colored section, and reloading during this time will give a more noticeable bonus, as well as preventing jamming for the next magazine. |
Reloading is a core mechanic in every shooter game, but Synthetik emphasizes it even more. For most weapons, there are three steps to reloading. By default keybindings, the player presses E to eject the magazine (and any bullets left inside), then R or Space to begin the act of inserting a new magazine. As the bar (3 in the table above) fills, the player then tries to press R or Space once more when the white bar is within the active reload area (4 in the table above). Achieving active reload will give some minor stat bonuses until the original magazine size is depleted, i.e. a weapon with 45 magsize will only have the bonus for 45 bullets, so any extra bullets regenerated will not gain the bonus.
Manual ejection can be turned off, but it is not recommended by the game.
Weapon Jamming[ | ]
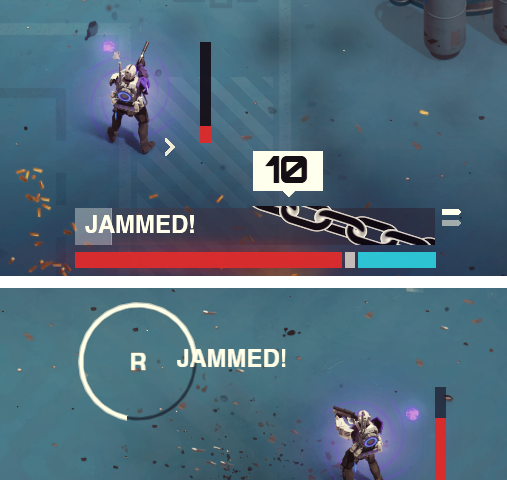
Your weapon may jam at any time, as long as the Weapon Jamming difficulty modifier is activated. To clear a jam, simply mash the Reload key (default R or Space) until the jam clears. You can also clear most of a jam by continually trying to fire however this will take significantly longer and will still require a single R press when the jam is 99% cleared. Clearing the Jam will instantly reload the gun and save the previously remaining bullets.
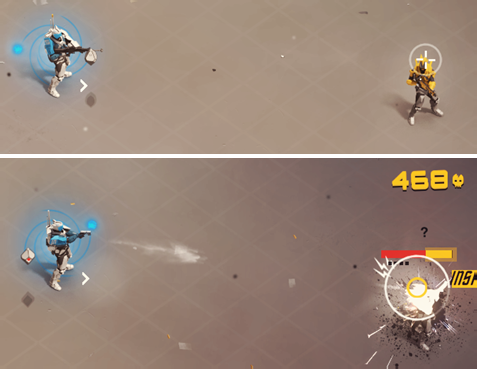
Enemy Health Bar[ | ]

| Number | Description |
|---|---|
| 1 | The enemy's health. Red is the base health, blue is an amount of shields that will regenerate after a set time of taking no damage, and white bars are units of Plating which will absorb any one amount of damage before permanently being destroyed. |
| 2 | If the enemy has a gun that requires reloading, the black dots under its health bar represent the ammunition currently in its magazine. Doesn't usually display until the enemy has only a few shots left. |
| 3 | When the enemy runs out of ammo it will reload, represented by a diminishing white bar where the ammo count was previously. |
Upgrading and Enhancing[ | ]
Throughout the run, you will have the chance to acquire and upgrade many kinds of Weapons and Items, as well as enhance the base stats of your android. These helpful tools can be found in a few ways, including Chests randomly found in levels, Shrines where you can buy them for credits, or as random drops from enemies. Items can be given more power at Item Upgrade Shrines. Android perk and stat upgrades can be found via Module Pickups, special chests, and certain item passives. Weapons can be given stat boosts at Weapon Upgrade Shrines.
Weapons can also gain Attachments that both enhance their power and change the way they function. Look out for the blue upgrade kits (most commonly dropped by enemies or bosses) to obtain these enhancements: 
Difficulty Modifiers[ | ]
Difficulty modifiers are additional changes to the gameplay that make the game harder in exchange for a increased difficulty modifier to experience and data, as well as each providing their own unique gameplay bonus. Difficulty modifiers may be enabled or disabled from the main menu before the start of a run.
| Icon | Name | Difficulty | Bonuses | Difficulty Modifier | Notes |
|---|---|---|---|---|---|
| Base |
|
|
+30% |
| |
| Manual Ejection | This is the active reload mechanic. Having it on requires the player to perform the actions described in the Active Reloading section. |
|
+10% |
| |
| Jamming | Weapons have a realistic chance to jam and require unjamming. |
|
+10% |
| |
| Flinch | Taking health damage causes flinching, decreasing accuracy and movement speed for a brief moment. |
|
+10% | ||
| Scorching | Weapons cool down 20% slower and overheating causes double damage. |
|
+10% |
| |
| Haste | All projectiles fly faster. Active Reloads are randomized. |
|
+10% | ||
| Deflect | Armored enemies gain 15 armor, requiring more specialized weapon usage. |
|
+10% | ||
| Hard Core 1 |
|
|
+15% | There isno Hard Core 2, despite this being called Hard Core 1. | |
| Critical | Enemies have a 10% chance to critically strike for 150% damage. |
|
+15% | ||
| Fragile | Taking health damage reduces maximum health by 5% of the damage instance (minimum -1). Medical crates add back 50 lost health, and a boss kill adds back 75. |
|
+15% | Can also increase player health above its default value. | |
| Lightning Start | More difficult 1st floor, or more difficult enemy waves until wave 10 (for Arena). (Unlisted) Increases enemy elite spawns for the whole run. |
|
+25% |
Research[ | ]
Research items add small things to the game, and can be purchased for Data from the main menu. Many have a minimum Profile Level requirement before they can be purchased. Once purchased, Research items are permanently added to the game.
| Name | Description | Data Cost | Level Requirement | Notes |
|---|---|---|---|---|
| Weapon Variants | All weapons can be found in many different variants, with varied properties and often adding special effects. | Unlocks Automatically | Level 4 | |
| Ultra Variant | Doubles the chances of finding the Rare Ultra Variant weapon variant. | Unlocks Automatically | Level 4 | |
| Powerups | Enemies can drop new powerups:
|
100 Data | Level 5 | |
| Daily Reward | Gain Data and XP for all classes when logging in. Resets each 12 hours and stacks per hour left. After 24 hours, the bonuses accumulate at half speed for a maximum of one month. | 50 Data | Level 5 | |
| Daily Modules | Every day, 3 different random Memory Modules are overcharged at one of three tiers for each class, granting higher power. One is given a 20% Tier 1 bonus, one a 40% Tier 2 bonus, and one a 60% Tier 3 bonus. | 150 Data | Level 10 | Unlisted, but there is a rare "Tier 4" bonus that gives 100% increased module power. |
| Supply Hack | Allows altering of item and weapon drop chances by assigning Power Tokens in the databases. Items and weapons with higher assigned drop chances will always appear in terminal shops. | 150 Data | Level 15 | See next section for further information. |
| Explosive Research | Rocket launchers gain target missiles, which follow the cursor.
Grenade launchers gain impact grenades. |
150 Data | Level 20 | Originally says "
Grenade launchers gain blunt force impact and airburst grenades." But airburst grenades seem to be unimplemented or cut. |
| Variant Kit 1 | Weapons can be found in new variants:
|
150 Data | Level 20 | |
| Variant Kit 2 | Weapons can be found in new variants:
|
150 Data | Level 20 | |
| Combat Logs | TAB shows internal android combat logs with detailed information. | 150 Data | Level 25 | |
| Prestige Shop | Unlocks the Prestige Shop which allows you to spend data on game modifiers. | 500 Data | Level 25 | Can be found by clicking on the diamond next to the game logo at the main menu. |
| Recycling Info | Unlocks information about hidden recycling bonuses for all items, marked with "R:" on any item with a recycling bonus. | 150 Data | Level 30 | Some items will still display their recycling bonus as "???" |
| Variants | Non-pistol starting weapons come in non-standard variants. | 1000 Data | Level 100 |
Supply Hack/Weapon Tokens[ | ]
Upon obtaining the 'Supply Hack' research, the player can alter spawnrates and improve the quality of chosen items and weapons when found. Each set of weapon and item hacks is tracked separately per player class. (i.e. Engineer can have a different set of items affected than Heavy Gunner or Breacher.) Legendary items cannot be affected by occurrence arrows.
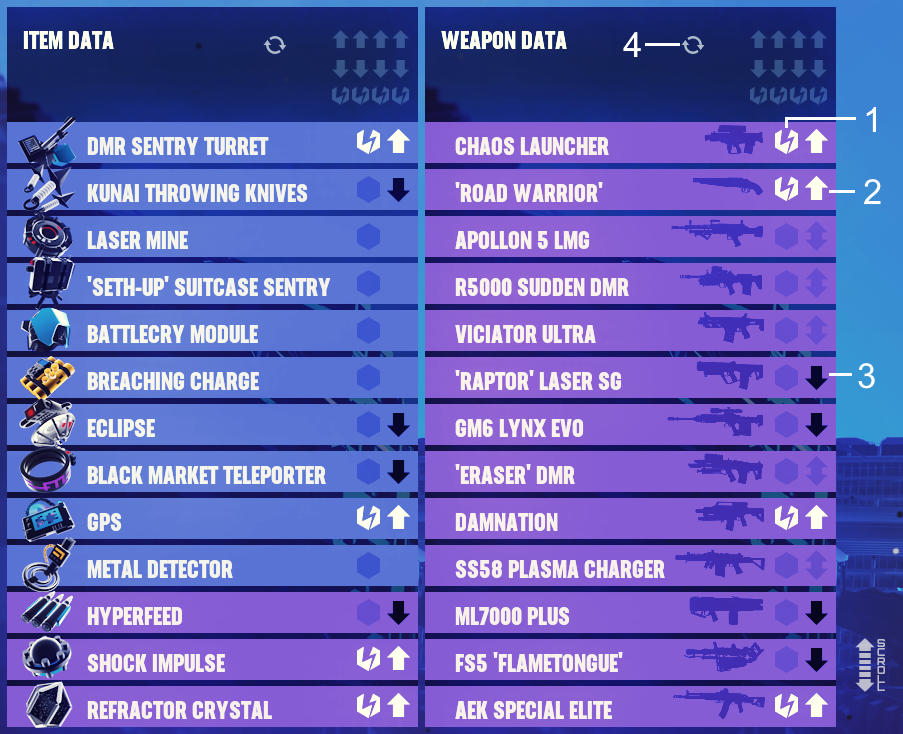
| Number | Description |
|---|---|
| 1 | Power token, can be applied to 4 items/weapons. Increases item power by 20% when found, increases ammo gain by 20% and damage by 5% on weapons when found. |
| 2 | Occurrence increase arrow. Increases spawnrate for the item, and one of the player's selected items/weapons will always appear in a shop when one is found. |
| 3 | Occurrence decrease arrow. Reduces spawnrate for the item. |
| 4 | Resets selections. |
Character level, Prestige, Challenges[ | ]
Every single class has an independently tracked XP bar which will have intermittent rewards every level, with milestones each 5 levels up to 25.
XP is earned by killing enemies, and all XP gain is multiplied by the difficulty modifier.
The Class selection menu can be opened by pressing TAB on the main menu. The class abilities are always displayed. (See individual pages for ability breakdowns.)
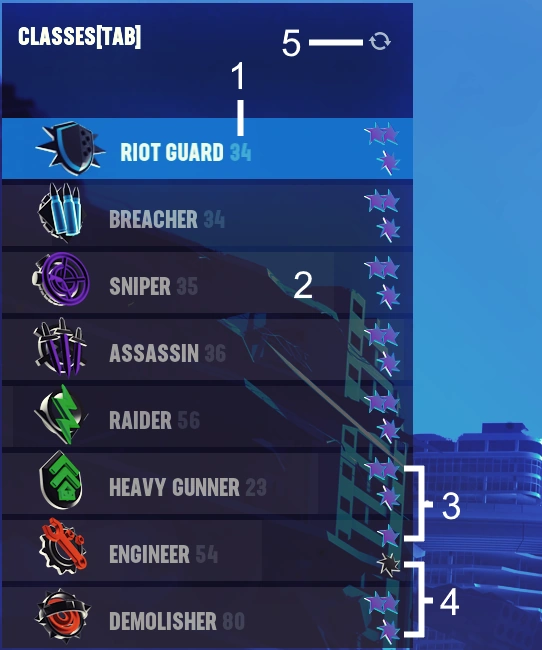
| Number | Description |
|---|---|
| 1 | Current class level. |
| 2 | Background white bar quickly indicates how close any one class is to leveling. Hovering over a selection will give an exact XP value. |
| 3 | Prestige Stars, will be explained further down. |
| 4 | Challenge Stars, will also be explained further. |
| 5 | Reset tutorial. |
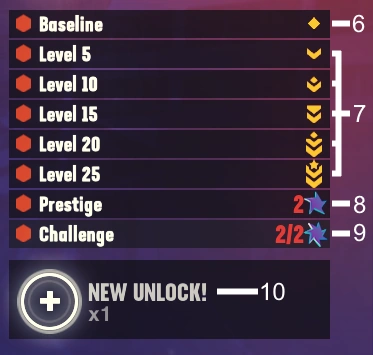
| 6 | Basic class ability, always unlocked. |
| 7 | Class level abilities, unlock every 5 levels until 25. The player can still gain levels, but they will not affect stats or abilities any further. |
| 8 | Prestige unlock and amount. Can be unlocked when a class is level 25 and after unlocking the prestige shop. Activated by spending 1000 Data and resets class level. This permanently unlocks the prestige ability. Does not increase the effect more if applied more than once. |
| 9 | Challenge stars, challenge level 1 (Indicated by a black 7-sided star) is achieved by beating Last Defender on at least 140% difficulty as the class and unlocks a permanent minor stat buff for all classes. Challenge level 2 (blue animated 7-sided star) or the "Insanity Challenge" grants a new class-specific ability upon completion. Can be unlocked by beating standard mode on 200% or higher, as well as beating all extra modes on 140% or higher. |
| 10 | Module unlock tokens. One is earned every level, and permanently unlocks modules for the class group. Once all modules are unlocked, instantly grants 35 data instead. Can be redeemed at any time. |
Starting items and Modules[ | ]
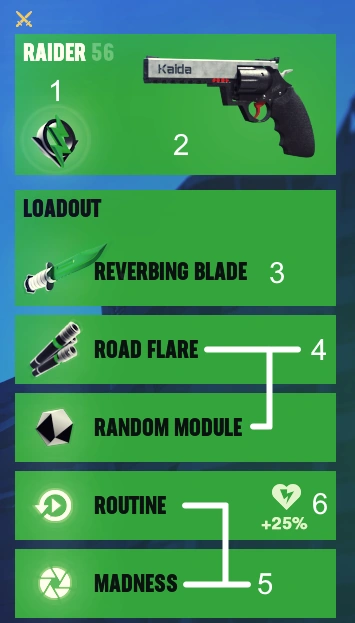
All class groups have different available items, modules, and pistols that can be selected before a run. - See individual class pages for specification.
| Number | Description |
|---|---|
| 1 | Core ability, can't be swapped out and different per class. |
| 2 | Pistol, can select between 9 (7 generic (2 are DLC) and 2 class group unique) pistols. |
| 3 | Unique item, can't be swapped out and different per class. |
| 4 | Starting items, can choose between 10 or 11 items (4 generic, 6 or 7 class group unique) and can be reset to a random module by right-clicking. |
| 5 | Modules, can be unlocked by using module unlock tokens which are earned by increasing class level. Every class group has 15 or 16 modules all with unique effects. Can also be reset to a random module via right-click. |
| 6 | Overdrive slot. Increases module's power in this slot by 25%, which is unlocked at class level 20. In co-op, this slot is replaced with a shared slot that still increases the module power, but also shares the module with your ally, and vice-versa. |
Lab levels, Data, XP Boosts[ | ]
There are some progression values which are tracked and can be seen in the main menu:
- Data - Earned by using terminals, opening chests and beating bosses. Multiplies the amount earned per run by the difficulty modifier. Capped at 1000.
- Lab levels - Every level gained with any class adds to this, every prestige gained increases this by 25 flat, required for research.
- XP Boosts - Unlocks after the "Daily Reward" research is bought and builds up while the game is closed. One boost is consumed automatically per run, which activates a 15 minute XP gain buff for the run.
- Lab levels are required to unlock some weapons:
- Spectre at level 5
- Human RPG-7 at level 5
- LS Laser Sub at level 7
- Medic FMG-9 at level 7
- Ballistic CRX-Bow at level 7
- T 8-00-Gauge at level 20
General Tips and Tricks[ | ]
- Synthetik supports both careful tactical play and quick and hectic play. It is highly recommended to always play carefully however. Never rush blindly into a situation you might not be prepared for.
- While careful play is certainly encouraged, that doesn't mean to get too sheepish- it's a good idea to learn to keep moving while in combat. Stagnant play is punished when tough bosses and beefy enemies start appearing.
- Feeling like your kit isn't working out? Try a different class! There are many ways to play the game, and the right class for you might not be what you initially expect, so try them all.
- If you're having trouble reloading, try using the spacebar exclusively instead of the E and R keys.
- Dashing is a key component to moving around the battlefield. Dash and dash often. Learning the timing and utilizing it correctly will save you from a lot of dangerous situations.
- Use your credits wisely. Think twice about buying that shiny new gun when you already have an upgraded death machine but almost no items to speak of.
- If you're playing in co-op have some common courtesy- all chests are not shared (except for golden chests) so be sure to not to leave your buddy high and dry, sharing is caring. You can press L to drop weapons, and you can drop unwanted items by dragging them above your item bar.
- Tap firing is generally better than going full auto with high recoil weapons, be sure to get acquainted with the arsenal so you know what weapons suit your general playstyle better.
- Dying a lot? That's okay, it happens. The more you play the better you become. If you're finding the game a bit too challenging, lower your difficulty modifiers or invest in a mystery boost (if you've unlocked it via research).
- Experiment. There are a lot of items, weapons, mods, and equipment at your disposal, so don't be afraid to pick up that strange new red item you see at the shrine. Might be the best thing ever, who knows?
- Stutter-stepping or pausing during movement are adequate ways to increase your accuracy on the fly. If you run around at max speed with a precision rifle, don't expect to hit much unless the barrel of your gun is touching them.
- Classes get minor damage bonuses for using specific weapons. Guardians prefer shotguns and SMGs, Rogues prefer DMRs and Snipers, Commandos prefer ARs and heavy MGs, (Although they don't actually get any stat bonuses from them.) and Specialists prefer laser, plasma and explosive weaponry.
- While the above point should be kept in mind, don't feel afraid to experiment with different weapons either! Almost anything can work for any class, the class bonus is more of a suggestive guideline than a rule.
- Don't underestimate your pistol! If you take your time and aim for headshots, the first two floors can easily be cleared with just your starting handgun. No need to rush for that weapons crate.
- Spend your data! Data caps at 1000, so be sure to use it when you have it to unlock everything.
- If your item bar is full and you want to use that weapon upgrade kit just lying there, simply drag an item off the bar (not recycle), pick up and use the kit, and grab your item again. No more waste!